
AppImageLauncher Easily Integrate AppImages on Linux
AppImageLauncher is a utility designed to improve the experience of using AppImage files on Linux. It bridges the gap between the AppImage format’s portability and the typical expectations users have from traditional Linux applications — like launcher integration, updates, and consistent management.
Key Features Explained

Automatic integration
Adds AppImages to your desktop menu automatically, so you can launch them like regular installed applications with one click.

Centralized AppImage
Moves all AppImages to one directory, making them easier to manage, organize, update, or delete from a single location.
Desktop file generation
Creates .desktop files and application icons automatically, so your AppImages look and behave like native Linux applications in menus.

Built-in AppImage update
Supports updating AppImages that include update information, helping you stay current without downloading the entire file again manually.
How AppImageLauncher Works
Step-by-Step User Experience
Using AppImageLauncher simplifies the otherwise manual process of managing AppImage files. Here’s how it works from the user’s perspective:
Download an AppImage
- The user downloads any .AppImage file from the internet (e.g., Krita, Kdenlive, etc.).
Make It Executable (if not already)
- Right-click → Properties → Permissions → Enable “Allow executing file as program”.
Launch the AppImage
- Double-click or run it from the file manager.
- AppImageLauncher intercepts this action.
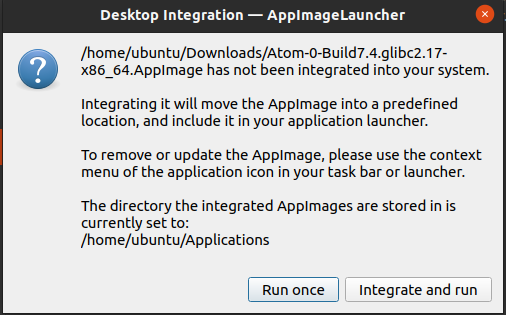
Integration Prompt Appears
- “Would you like to integrate this AppImage with your system?”
You’re given two options: - Integrate and run
- Run once
If Integrated
- The AppImage file is moved to a dedicated directory (usually ~/Applications).
- A .desktop file is created in your application menu.
- A proper icon is extracted or assigned.
Launch from Menu
- From now on, the app can be launched from your application launcher (e.g., GNOME menu, KDE launcher), just like any native app.
Example: Opening a Downloaded AppImage
Let’s say you download Kdenlive.AppImage from its official site:
- Double-click the AppImage.
- “Do you want to integrate Kdenlive into your system?”
- You click Integrate and run.
- The AppImage moves to ~/Applications, and Kdenlive appears in your menu with its icon.
- Done. You now run it like a regular installed app.
Optional Integration Prompt
You can always choose Run once if you don’t want to integrate the AppImage. This means:
- It won’t be moved.
- It won’t appear in your launcher menu.
- It behaves like a standalone app running temporarily.
- This is useful for quick testing or one-time use.
Menu and System Integration
Once integrated:
- The app is listed alongside native apps in your system menu.
- Icons, metadata, and categories are managed automatically.
- Updates (if supported) can be triggered through AppImageLauncher or via AppImageUpdate.
- Removal is as easy as deleting it from the Applications folder, or using the built-in AppImageLauncher removal feature.
Installation Guide
How to install AppImageLauncher on various Linux distributions
AppImageLauncher can be installed easily on most Linux distributions using pre-built packages or source code. Below are platform-specific methods:
Debian / Ubuntu
You can install AppImageLauncher via .deb package:
Steps:
- Go to the AppImageLauncher GitHub Releases page.
- Download the appropriate .deb file (e.g., appimagelauncher_2.3.1-travis998.0f91852.bionic_amd64.deb for Ubuntu 18.04+).
- Open a terminal and install it:
sudo dpkg -i appimagelauncher_*.deb
sudo apt-get install -f # To fix dependencies, if needed
Other Distributions
If you’re using a distro not listed above, or prefer not to use your package manager:
Use the Generic Tarball or AppImage (when available):
- Visit: https://github.com/TheAssassin/AppImageLauncher/releases
- Look for a portable version or a .tar.gz build.
- Extract it and follow included README or instructions.
Download from GitHub Releases
The latest official builds are always available at:
AppImageLauncher appimagelauncher.com Releases.
Make sure to:
- Choose the package that matches your distro and architecture (e.g., amd64 for 64-bit)
- Read release notes for compatibility info
User Interface Overview
Although AppImageLauncher is primarily a background utility, it offers some user interface elements that help users manage their AppImages easily and efficiently. Let’s break down the components and features of its GUI (Graphical User Interface), where applicable.
Description of the GUI
- AppImageLauncher doesn’t have a full-fledged dashboard like a traditional app.
- Instead, it presents dialogs and prompts during key user actions — such as when you open an AppImage file.
- When launching a new AppImage, a dialog box appears asking:
- “Would you like to integrate this AppImage with your system?”
- You can choose to:
- Integrate and run
- Run once without integration
This minimalist approach makes the tool lightweight and non-intrusive, while still giving users control over AppImage handling.
Update & Remove Options
AppImageLauncher often integrates with AppImageUpdate (if supported by the AppImage), enabling:
Update Functionality:
- Right-clicking an integrated AppImage in your launcher (on some systems) may offer an “Update AppImage” option.
- Alternatively, running the same AppImage again may trigger an update dialog.
- It uses built-in update features (like zsync) if the AppImage developer enabled them.
Remove Functionality:
You can remove an integrated AppImage by:
- Deleting the .AppImage file from the managed directory (e.g., ~/Applications)
- AppImageLauncher will detect this and automatically clean up the associated .desktop file and icon from your system menu.
- Some desktop environments may also show a “Remove” option in the app menu.
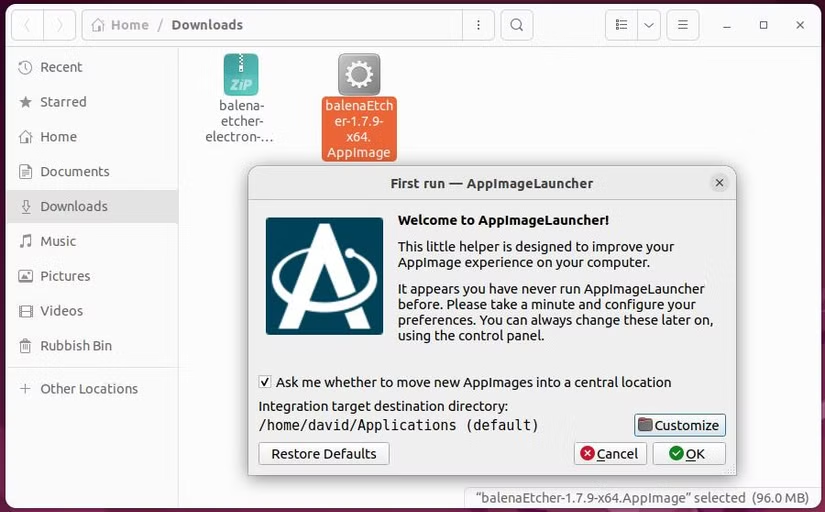
Settings / Preferences (if available)
Depending on the installation method and system integration, AppImageLauncher may include a basic settings dialog (especially in newer versions or full-featured builds):
Key Settings (when available):
- Default integration directory (e.g., change from ~/Applications to another location)
- Auto-update settings (enable or disable automatic update checks)
- Behavior on launch (e.g., always integrate, never integrate, ask every time)
- Update command preferences (use AppImageUpdate or skip)
To access the settings:
- Look for AppImageLauncher Settings in your application menu.
- Or, run appimagelauncher-settings from the terminal if available.
Benefits of Using AppImageLauncher
AppImageLauncher offers several practical advantages for Linux users who frequently work with AppImage applications. It helps transform a portable app experience into a smooth, desktop-integrated one. Here’s how:
Simplified AppImage Management
Without AppImageLauncher, users need to manually manage their AppImage files—deciding where to store them, creating launchers, and handling updates individually. AppImageLauncher streamlines all of this:
- Automatically moves AppImages to a designated folder (e.g., ~/Applications)
- Helps keep your system clean and organized
- Offers update and remove functions, saving time and effort
No Need for Manual .desktop File Creation
By default, AppImages don’t appear in your system menu. Normally, you’d have to manually create a .desktop launcher file and assign an icon. AppImageLauncher eliminates this tedious step by:
- Generating the .desktop file automatically
- Adding the correct application icon
- Making the app searchable in your application menu (just like installed software)
Makes AppImages Feel Like Native Applications
One of the biggest drawbacks of AppImages is that they feel “separate” from your system. AppImageLauncher bridges that gap:
- Apps show up in your system’s start/menu launcher
- Icons appear properly on the desktop or taskbar
- Launch behavior mimics traditional installed apps
- You can pin, search, and launch them just like any other software
Encourages Centralized Organization
AppImageLauncher promotes order by storing all AppImages in a single, user-defined folder (~/Applications by default). This has several benefits:
- Easy backup and migration of applications
- Cleaner home directory with no scattered executable files
- Simple removal or update workflow, since all AppImages are in one place
FAQs (Frequently Asked Questions)
Can I use AppImageLauncher on any Linux distribution?
Yes, it works on most modern Linux distributions including Ubuntu, Fedora, Arch, and others.
Does AppImageLauncher require root access?
No, it typically works without root permissions for user-level integration.
What is AppImageLauncher?
AppImageLauncher is a tool that helps integrate AppImage applications into your Linux system’s application menu and manage them easily.
Do I need AppImageLauncher to run AppImages?
No, AppImages can be run without it, but AppImageLauncher provides convenient system integration features.
What happens when I open an AppImage with AppImageLauncher?
You’re prompted to integrate it — which moves the AppImage to a central folder and adds it to your app menu.
Is AppImageLauncher available in the Arch User Repository (AUR)?
Yes, you can install it using an AUR helper like yay:
yay -S appimagelauncher
Where does AppImageLauncher store integrated AppImages?
By default: ~/Applications (user mode) or /Applications (system mode).
Can I change the integration directory?
Yes, you can configure a custom directory through its settings.
Does AppImageLauncher support updates?
Yes, if the AppImage supports AppImageUpdate, AppImageLauncher can update it for you.
Will the AppImage show in my application menu after integration?
Yes, it will appear like a native installed application with icon and name.
Can I integrate multiple AppImages at once?
No, integration happens per file when you first launch them.
Does AppImageLauncher create .desktop files?
Yes, it auto-generates them for menu integration.
Can I use AppImageLauncher with GNOME/KDE/XFCE?
Yes, it works with all major desktop environments.
What happens if I delete an AppImage directly from the Applications folder?
You’ll need to manually remove its launcher entry unless you use AppImageLauncher’s remove function.
How do I update an AppImage with AppImageLauncher?
Right-click on the app in your application menu (if supported) or run the AppImage again to see update options.
Does AppImageLauncher notify me of updates?
No, it does not check for updates automatically.
How do I remove an integrated AppImage?
Open AppImageLauncher’s control panel and choose to remove it, or manually delete the file from the integration folder.
Will removing the AppImage also remove its menu entry?
Yes, if removed via AppImageLauncher.
Is AppImageLauncher required to uninstall AppImages?
No, but it simplifies the process by cleaning up menu entries and icons.
Can I run AppImageLauncher in headless or CLI mode?
No, it’s primarily a GUI-based tool.
Can I disable the integration prompt?
Yes, there is an option to disable prompts and run AppImages without integration.
Does AppImageLauncher affect performance?
No, it runs only during AppImage handling and doesn’t stay active in memory.
Can I whitelist trusted AppImages for automatic integration?
No direct whitelist, but you can streamline the prompt with settings.
Is it safe to use AppImageLauncher?
Yes, it’s widely trusted in the Linux community and doesn’t require root by default.
Does it work with sandboxed or signed AppImages?
Yes, it works with standard AppImages regardless of sandboxing.
What if an AppImage doesn’t integrate properly?
Check if the AppImage is valid, or try reinstalling AppImageLauncher.
Can I use AppImageLauncher with non-standard AppImage builds?
It should work, but functionality depends on proper internal structure (metadata, icons, etc.).
Will it interfere with other AppImage tools?
Generally no, but avoid running conflicting integration tools at the same time.
Schema
AppImageLauncher - Easy AppImage Integration
AppImageLauncher integrates AppImages into your Linux system, letting you run, update, and remove them easily with one click. #AppImageLauncher
Price: Free
Price Currency: $
Operating System: Linux
Application Category: Software
4.2